Building a Ruby CLI with Thor
Diario del capitán, fecha estelar d650.y38/AB

We have written a Ruby CLI using Thor for a client project and we share everything we've learnt in the process in this blog post!
Long story short, I have had to develop a new geocoding feature for one of our SaaS clients. For the system to work, it was necessary to have real geolocation data, so some time ago, I had written some scripts in Node.js to import data from staging into development. But since this is a Ruby project, I thought it'd be more coherent if the scripts were written in Ruby, so I decided to rewrite them.
Spoiler: The experience has been very smooth and I have to confess that the resulting code was much nicer and clean that the Node.js predecessor.
Since I wanted to write a CLI I decided to give Thor a try. I have been overall very pleased with how easy to use this library is.
Let's get into detail!
Good question: Thor is a toolkit for building powerful command-line interfaces. It is used in Bundler, Vagrant, Rails and others. In fact, their website is that very question: what is Thor?
To organize things, I've decided to put all the code inside lib/api-client, so I created a new file at bin/api with the following code:
#!/usr/bin/env ruby

require_relative '../lib/api-client/cli'
And, of course, the mandatory chmod +x bin/api to make it executable.
The first thing I want my CLI to do is to generate the Authorization token to be used with tools like Postman or Insomniac:
# lib/api-client/cli.rb

require 'dotenv/load'
require 'thor'
require 'digest'
require 'active_controller'

module ApiClient
  # The ApiClient Command Line Interface (CLI entry point, see `bin/api`)
  class CLI < Thor

    desc 'auth [BUSINESS_ACCESS_TOKEN]', 'create the `Authorization` header for the API'
    def auth(business_access_token = nil)
      business_access_token ||= ENV['BUSINESS_ACCESS_TOKEN']
      if business_access_token.blank?
        STDOUT.puts 'BUSINESS_ACCESS_TOKEN is required'
        STDOUT.puts 'You can write it in .env file to make it default'
      else
        STDOUT.puts "BUSINESS_ACCESS_TOKEN=#{business_access_token}"
        nonce = Time.now.to_i
        token = Digest::SHA256.hexdigest("#{business_access_token}#{nonce}")
        auth = ActionController::HttpAuthentication::Token.encode_credentials(token, nonce: nonce)
        STDOUT.puts auth
      end
    end
  end
end

ApiClient::CLI.start(ARGV)
As you can see, the code is very straightforward. Thor makes things very easy, by mapping CLI arguments into function parameters. Optional parameters are also supported, of course.
The only thing that is a little bit different from normal is that I don't want to write the BUSINESS_ACCESS_TOKEN every time, so I used dotenv library to load from .env file if is not explicitly written.
Our client's API is REST and, for my purpose, I just needed to use one resource. But thinking about the future, I found it convenient to write the CLI with the idea of growing to other resources.
Enter Thor subcommands.
With Thor, it is very easy to support subcommands à la git-style. Basically, you write a CLI and make it a "children" of another parent CLI. The subcommand is exactly the same as a regular Thor "commands" class:
# lib/api-client/locations_cli.rb

require 'thor'

module ApiClient
  class LocationsCLI < Thor
    class_option :env, type: :string, aliases: :e, default: 'development',
                        required: true, banner: 'development',
                        desc: 'The environment to use: development or staging'
    class_option :token, type: :string, aliases: :t, banner: 'BUSINESS_ACCESS_TOKEN',
                          desc: 'The business access token'

    desc 'create BUSINESS_ID FILE', 'create locations from FILE (json format)'
    option :limit, type: :numeric, aliases: :l, banner: 'number',
                    desc: 'The maximum number of locations to create'
    def create(business_id, json_file)
      ...
    end

    desc 'update BUSINESS_ID LOCATION_ID JSON', 'update a location from JSON'
    def update(business_id, location_id, json)
      ...
    end
  end
end
Some things to notice here. Let's stop for a minute.
First, Thor makes it easy to add shared options to all commands by using the "class_option" method. On the other hand, the "option" method is used to specify command options. As you can read, because you add "help" support to the commands, all code becomes quite self-explanatory.
In this snippet, I have removed the actual code, and more importantly, the long description displayed by Thor to explain each command. Take a look at "Long Description" on the Thor website.
As I said, LocationsCLI is a normal Thor "commands" class, which could be used as a standalone CLI in itself, but you can "mount" this inside another one to become a subcommand:
# lib/api-client/cli.rb

module ApiClient
  class CLI < Thor

    desc 'auth [BUSINESS_ACCESS_TOKEN]', 'create the `Authorization` header for the API'
    def auth(business_access_token = nil)
      ...
    end

    desc 'locations SUBCOMMAND ...ARGS', 'manage locations via API'
    subcommand 'locations', ApiClient::LocationsCLI
  end
end

ApiClient::CLI.start(ARGV)
When I started to write the actual code for the ApiClient::LocationsCLI, the first thing to became evident is that I needed the "create auth token" I have written about before.
The second thing is that I will have to do some kind of repetitive task like sending a POST request with parameters, so I decided to create a class to encapsulate all Http-related stuff:
# frozen_string_literal: true

require 'net/http'
require 'uri'
require 'json'
require 'digest'
require 'action_controller'

module ApiClient
  # A minimal layer over net/http to simplify sending requests to Client API
  class Http

    attr_reader :url, :token

    API_URLS = {
      staging: 'http://projectname-staging.client.com/api/v1',
      development: 'http://localhost:3000/api/v1'
    }.freeze

    METHODS = { post: Net::HTTP::Post, put: Net::HTTP::Put }.freeze

    def initialize(environment, token = nil)
      @url = API_URLS[environment.to_sym]
      @token = token

      throw "Environment not valid: #{environment}" if @url.blank?
    end

    def authorization
      return '' if @token.blank?

      nonce = Time.now.to_i
      token = Digest::SHA256.hexdigest("#{@token}#{nonce}")
      ActionController::HttpAuthentication::Token.encode_credentials(token, nonce: nonce)
    end

    def send_request(method, url, body = nil)
      uri = URI.parse(url)
      http = Net::HTTP.new(uri.host, uri.port)
      request = METHODS[method].new(uri.request_uri, header)
      request.body = body.to_json if body.present?
      http.request(request)
    end

    def header
      {
        'Content-Type' => 'application/json',
        'Authorization' => authorization
      }
    end

  end
end
Basically, this class allows me to send a request to a url, with an optional body, and with the correct headers. I changed the auth command of the CLI to use this class.
Last, but not least, I wanted to separate the CLI logic from the logic of interacting with the API, so I created another class using the previous ApiClient::Http class to perform the tasks I need. The class has the following shape:
# lib/api-client/api.rb

require_relative './http'

module ApiClient
  class Api

    attr_reader :http

    def initialize(environment, token = nil)
      @http = Http.new(environment, token)
    end

    def create_locations(business_id, locations)
      ...
    end

    def create_location(business_id, location)
      ...
    end

    def update_location(business_id, location_id, location)
      ...
    end

  end
end
Again, no surprises here. Now, the ApiClient::LocationsCLI class' only purpose is to bridge Thor and the API methods.
Here's a complete LocationsCLI command example with full description:
module ApiClient
  class LocationsCLI

    ...

    desc 'update BUSINESS_ID LOCATION_ID JSON', 'update a location from JSON'
    long_desc <<-LONGDESC
    `.bin/api locations update` will use the client API to update a location.

    The BUSINESS_ID and LOCATION_ID are required

    The JSON parameter is a JSON string with the params to update (remember to enclose
    the JSON between ')

    > $ ./bin/api locations update 1e55f77d cc7a921e '{ "name": "The New Name" }' -t xt4Xg
    LONGDESC
    def update(business_id, location_id, json)
      api = ApiClient::Api.new(options[:env], options[:token])
      api.update_location(business_id, location_id, JSON.parse(json))
    end
  end
end
As you can read, Thor can be quite verbose, so it reinforces the idea to keep business and CLI logic separated.
In the end, I have created a full-featured CLI very easily:
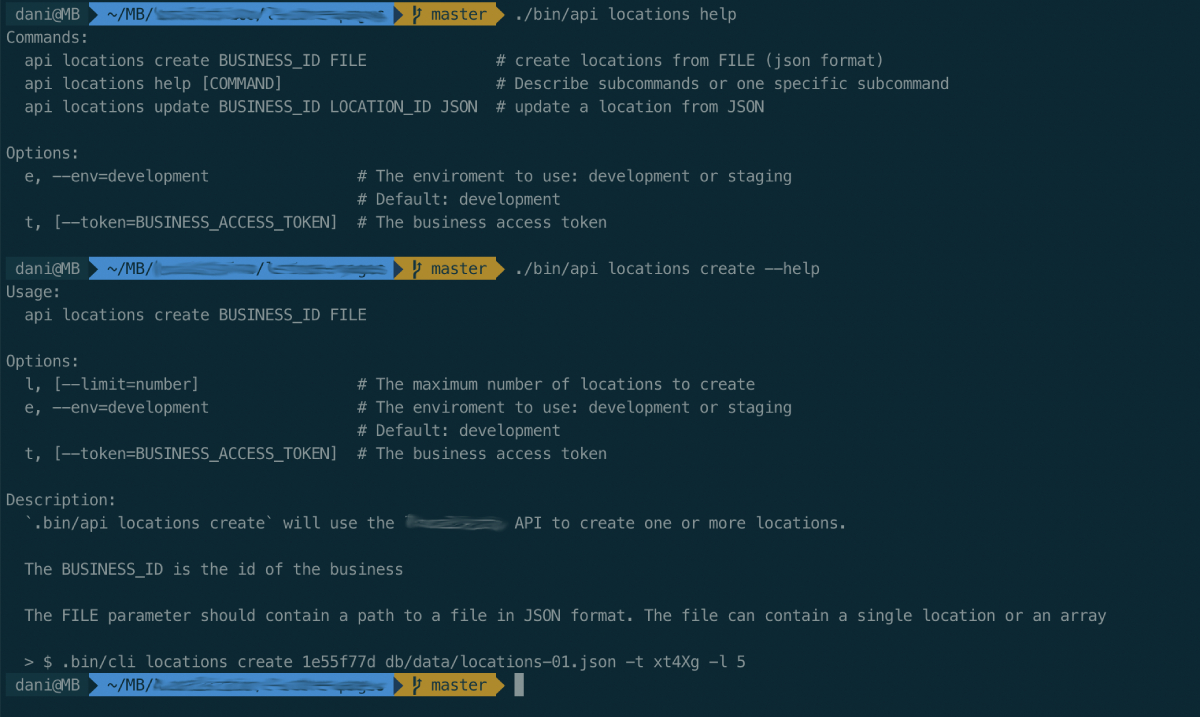
Writing a good CLI is not easy - I know from first-hand experience! - so I was extremely happy with Thor's structure. Subcommands are a great way to keep CLI organized and I have enjoyed this process a lot.
If you have some ungrouped scripts or the need to create something like a CLI, I wholeheartedly recommend you to give Thor a try. It was also created to empower the Rails CLI, by the way! 😉

This post is the first one of a series where we break down how to correctly upgrade a Ruby on Rails application.
Leer el artículo
This is a question we are asked all too frequently from outside the company. However, we recently asked this very question ourselves. Yes, we only do Ruby and that isn't going to change anytime soon.
Leer el artículo
GoLang has the option to create shared libraries in C, and in this post I will show you how to do it.
Leer el artículo